Silvercrest SKAS 1000 A16 Specifications Page 155
- Page / 192
- Table of contents
- BOOKMARKS
Rated. / 5. Based on customer reviews


Section 5
Removal and Installation
146
Step 1
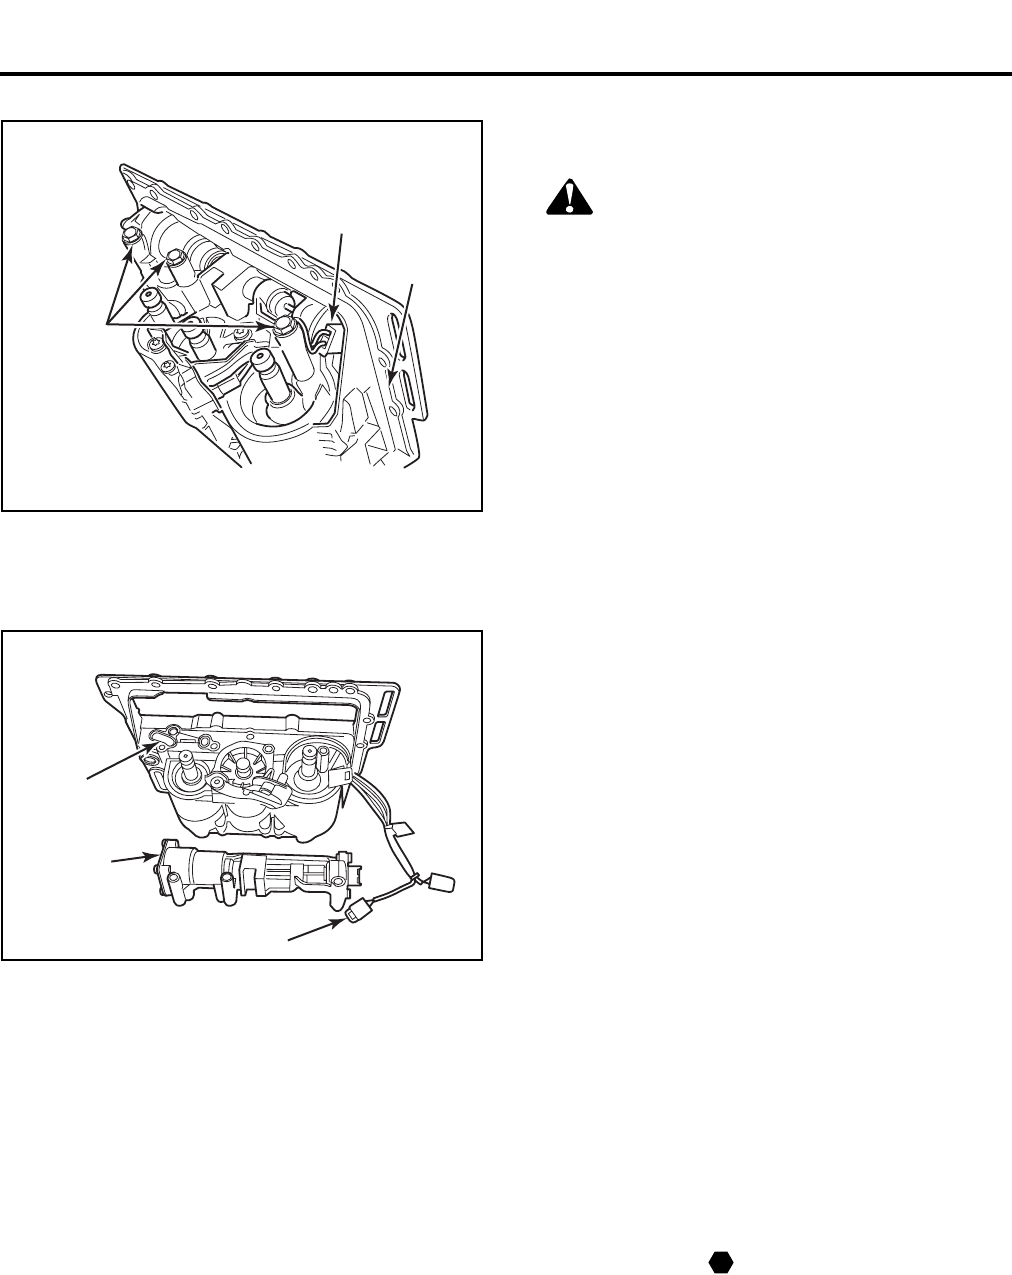
Selector Cylinder
WARNING
This procedure is to be performed only with
out-of-warranty cases. During warranty period,
the complete TCU must be exchanged.
NOTE: The repair kit contains the selector
cylinder and a profile seal.
Removal
Carefully raise the tab and pull the connector off
the sensor contact.
앫
GO TO THE NEXT STEP.
Step 2
Remove the three hex-head bolts.
앫
GO TO THE NEXT STEP.
Step 3
Take out the selector cylinder and remove the
profile seal.
앫
GO TO THE NEXT STEP.
Step 4
Inspect the parts and replace if necessary.
Installation
Step 1
NOTE: Apply Uni-Silicon GLK112 grease to the
sealing and sliding faces.
Insert the profile seal on the TCU’s lower section.
앫
GO TO THE NEXT STEP.
Step 2
Place the selector cylinder on the TCU’s lower
section.
앫
GO TO THE NEXT STEP.
Step 3
Install and tighten the three hex-head bolts to
17 lb-ft (23 N폷m).
앫
GO TO THE NEXT STEP.
Step 4
Plug the connector onto the sensor contacts.
4007254a
HEX-HEAD
BOLTS
CONNECTOR
LOWER
SECTION
SELECTOR
CYLINDER
4007255a
PROFILE
SEAL
TAB
T
- ZF-FreedomLine Transmission 1
- Service Notes 3
- Table of Contents 4
- Regulatory Guidance 6
- Model Numbers and Ratios 7
- Torque Specifications 8
- Acronyms 9
- Acronyms Referenced in Manual 9
- CLUTCH DISC CLUTCH HOUSING 10
- Section 1 11
- Introduction 11
- Section 2 16
- Fault Code Diagnostics 16
- Section 3 62
- Maintenance 62
- Applications) 62
- 4004150a 73
- 4004163a 73
- OEM INTERFACE CONNECTOR 73
- 4004164a 74
- 4004165a 74
- 4004166a 74
- 4004154a 75
- 4004167a 75
- 4004153a 76
- 4004169a 78
- MAIN TCU 78
- 4004168a 81
- 4004151a 85
- 4004155a 85
- 4004170a 86
- 10 L Minimum 86
- Trans. Reservoir 86
- 4004182a 86
- Pneumatic Requirements 87
- 4004156a 91
- 4004160a 91
- 4004161a 91
- 4004162b 92
- 4004152a 92
- 4001982b 93
- 4004179a 95
- 4004181a 97
- PUSH PIN 97
- 4004183a 99
- 4005005b 100
- Connector Pin Assignments 101
- Diagnostic Connector 101
- Resistance Specifications 101
- Section 4 102
- Wiring/Pneumatic Diagrams 102
- ACTUATOR 104
- Section 5 105
- Removal and Installation 105
- FASTENER — 108
- 4005603a 110
- FASTENERS 113
- (TYPICAL) 113
- 4005602a 115
- AIR LINE 115
- 4002015b 116
- SAE J-1939 116
- CONNECTOR 116
- 4002090a 118
- GUIDE PINS 120
- 4005019a 122
- CLUTCH COVER MOUNTING 124
- Voltage Doubler 126
- Electronic Controller (ZMTEC) 128
- Transmission Yoke 130
- Output Shaft Seal 134
- Input Shaft Seal 136
- Output Cover 137
- Air Filter Regulator 139
- TRANSMISSION 140
- CONNECTION 142
- 4007239a 142
- 4007237a 144
- 4005613a 150
- Shift Rail/TCU Cylinder 154
- Adjustments for Installation 154
- Adjust the Cylinder Pistons 154
- Selector Cylinder 155
- Travel Sensors Engage 160
- Splitter, Range and Select 160
- 4007244a 164
- 4002006a 169
- 4002016a 170
- Cooler By-Pass Valve 175
- Neutral Switch 178
- 4002025a 180
- 4002024a 181
- 4002033a 183
- 4002051a 186
- Release Bearing 189
 (70 pages)


Comments to this Manuals