Silvercrest SWS-A1 User Manual
Browse online or download User Manual for For Home Silvercrest SWS-A1. Silvercrest SWS-A1 User Manual
- Page / 190
- Table of contents
- BOOKMARKS
- IAN 103043 IAN 103043 1
- Wi‑Fi‑Steckdose 8
- Einführung 10
- Sicherheitshinweise 13
- Verwendung 23
- Instandhaltung 44
- Fehlerbehebung 45
- Reinigung und Pflege 46
- Garantie und Service 47
- Unterschrift: 51
- Hr� Thomas Günther 51
- Datum: 10-10-2014 51
- Ort: Hirrlingen, Germany 51
- Introduzione 56
- Presa Wi‑Fi 56
- Note sulla sicurezza 60
- Installazione 63
- Selezionare Salva� 74
- ● Come aggiungere un timer 75
- Conto alla Rovescia e Assenza 81
- Selezionare OK� 83
- ● Recupero password 88
- Manutenzione 91
- Risoluzione dei problemi 92
- Pulizia e manutenzione 93
- Garanzia e assistenza 94
- Dichiarazione di Conformità 97
- Table des matières 99
- Introduction 102
- Prise de courant Wi‑Fi 102
- Consignes de sécurité 106
- Installation 109
- Utilisation 116
- Entretien 136
- Dépannage 137
- Nettoyage et entretien 138
- Garantie et service 139
- Déclaration de conformité 142
- Contents 145
- 146 GB 146
- GB 147 147
- WiFi Socket 148
- Safety notes 152
- 162 GB 162
- 164 GB 164
- GB 165 165
- Select Save� 166
- ● How to add a timer 167
- 168 GB 168
- 170 GB 170
- ● How to add an Absence Mode 171
- Absence setting 173
- 174 GB 174
- Select OK� 175
- GB 177 177
- ● How to reset all settings 178
- ● Forget Password 179
- 180 GB 180
- Maintenance 182
- Cleaning and Maintenance 183
- Disposal 184
- Warranty and Service 185
- Declaration of Conformity 187
Summary of Contents
Stand der Informationen · Version des informations · Versione delle informazioni · Stand van de informatie · Last Information Update: 01/2015 · Ident.
Einführung10 DEFunkfrequenz: 2,412 GHz - 2,462 GHzFunkfrequenzstandard: IEEE 802�11 b/g/nEigene Leistungsaufnahme: <0,9 WStandby-Verbrauch: <0
100 FRUtilisation ������������������������������������������������������������� 116Comment allumer/éteindre manuellement un appareil ��������������
FR 101Comment rétablir tous les réglages �������������������������� 132Mot de passe oublié ���������������������������������������������� 133Entreti
Introduction102 FRPrise de courant Wi‑Fi ● IntroductionNous vous félicitons d'avoir fait l'acquisition de cette prise Wi-Fi� Vous avez ache
IntroductionFR 103L'altération de ce produit ou son utilisation d'une manière autre que celle prévue peut entraîner des blessures graves� L
Introduction104 FRConfiguration système requise : iOS 5�0 ou version ultérieure et Android 4�0 ou version ultérieureVersion du manuel : V1�5 ● Descrip
IntroductionFR 105 ● Droits de propriété industrielle et commercialeLe fabricant n'a ménagé aucun effort pour protéger les informations sur les
Consignes de sécurité106 FR ATTENTION!Ce symbole, avec le mot «ATTENTION !», désigne un danger imminent, qui, s'il est négligé, peut conduire
Consignes de sécuritéFR 107Cet appareil n'est pas destiné à être utilisé par des enfants et des personnes dont les capacités physiques ou mental
Consignes de sécurité108 FRsituations dangereuses� Ne branchez jamais une prise Wi-Fi dans une autre prise Wi-Fi� Ne surchargez pas une prise Wi
InstallationFR 109 Débranchez la prise Wi-Fi de la prise secteur pendant les orages, les éclairs et dès que le produit ne va pas être utilisé penda
EinführungDE 11 ● LieferumfangBitte entfernen Sie das Verpackungsmaterial und überprüfen Sie die Vollständigkeit der Lieferung� Eventuelle Fehlmenge
Installation110 FR – l'heure de votre téléphone portable est l'heure universelle� La prise Wi-Fi utilise les paramètres horaires de votre t
InstallationFR 111 Si vous utilisez l'application pour la première fois, appuyez sur Inscrivez‑vous� La fenêtre «Inscrivez-vous» s'ouvr
Installation112 FR Entrez l'adresse e-mail avec laquelle vous souhaitez vous enregistrez puis un mot de passe� Appuyez sur Inscrivez‑vous� S
InstallationFR 113 Connectez-vous à l'aide de votre adresse e-mail et mot de passe enregistrés, et appuyez sur Connexion pour confirmer� La fen
Installation114 FR Sélectionnez sur l'icône «+»� Votre réseau sans fil sera automatiquement sélectionné� Ajoutez le mot de passe de votre r
InstallationFR 115 Note: Toute prise Wi-Fi nouvellement installée est automatiquement appelée «kemanRT»� Le chapitre suivant décrit comment chan
Utilisation116 FR ● UtilisationIMPORTANT ! Utilisez l'application pour utiliser ou modifier les paramètres de votre prise Wi-Fi� Vous pouvez effe
UtilisationFR 117 ● Comment allumer/éteindre votre appareil en utilisant l'application Même si un appareil connecté est commandé au moyen d&ap
Utilisation118 FR Pour simplifier l'utilisation de plusieurs prises Wi-Fi en même temps il faut attribuer un nom distinct à chacune� Sélectionn
UtilisationFR 119 Sélectionnez Modifier� La fenêtre Édition apparaît�WiFi Sockets v1.4 DE-IT-FR-GB.indd 119 1/28/2015 2:50:36 PM
Einführung12 DE ● Erklärung der SymboleGEFAHR! Dieses Symbol zusammen mit dem Hinweis “GEFAHR!” kennzeichnet eine drohende Gefahr, die bei Nichtbeac
Utilisation120 FR Changez le nom de la prise Wi-Fi dans le champ «Nom»� Changez l'icône en sélectionnant une icône dans la liste ou appuye
UtilisationFR 121 ● Comment ajouter une minuterie La fonction minuterie permet de choisir le jour de la semaine et l'heure à laquelle un appar
Utilisation122 FR Dans la section Heure, réglez l'heure� Dans la section M/A choisissez si l'appareil connecté doit s'allumer ou s&a
UtilisationFR 123éteint� Dans la section Répéter choisissez les jours où l'appareil doit s'allumer ou s'éteindre� Sélectionnez Enreg
Utilisation124 FR Dans la section Après, réglez l'heure du compte à rebours� Dans la section M/A choisissez si l'appareil connecté doit s
UtilisationFR 125 ● Comment ajouter un mode Absence La fonction mode absence permet de définir une période pendant lequel l'appareil connecté s
Utilisation126 FR Définissez la période pendant laquelle votre appareil connecté doit s'allumer et s'éteindre toutes les 30 minutes� Sél
UtilisationFR 127 ● Comment supprimer Minuteur, Compte à rebours ou Absence Pour supprimer les réglages d'une minuterie, un compte à rebours o
Utilisation128 FR Appuyez sur la prise Wi-Fi que vous souhaitez supprimer et la maintenir appuyée jusqu'à ce que l'icône Corbeille appara
UtilisationFR 129 Appuyez sur l'icône Corbeille en bas de l'écran� Sélectionnez OK�WiFi Sockets v1.4 DE-IT-FR-GB.indd 129 1/28/2015
SicherheitshinweiseDE 13 ● SicherheitshinweiseBitte lesen Sie alle Sicherheitshinweise und -anleitungen� Der Hersteller ist nicht haftbar in Fällen
Utilisation130 FR ● Comment verrouiller et déverrouiller une prise Wi‑Fi Une prise Wi-Fi peut être verrouillée pour que d'autres utilisateurs
UtilisationFR 131WiFi Sockets v1.4 DE-IT-FR-GB.indd 131 1/28/2015 2:50:39 PM
Utilisation132 FR ● Comment rétablir tous les réglages Il est possible de réinitialiser la prise Wi-Fi et d'effacer tous les réglages� Pour
UtilisationFR 133 ● Mot de passe oublié Ouvrez l'application SilverCrest Wi-Fi plug� Appuyez sur Mot de passe oublié� WiFi Sockets v1.4 DE-I
Utilisation134 FR La fenêtre «Mot de passe oublié» s'affiche� Entrez l'adresse e-mail avec laquelle vous vous êtes enregistré et appuy
UtilisationFR 135réception de votre e-mail� Note: Cette opération peut prendre quelques minutes� Consultez également le dossier des e-mails indésira
Entretien136 FR Une fois le nouveau mot de passe accepté, vous recevrez le message : «Opération réussie»� Répétez l'opération si ce message
DépannageFR 137 ● Dépannage La prise Wi-Fi contient des composants électroniques sensibles� En d'autres termes, si la prise Wi-Fi est placée à
Nettoyage et entretien138 FR ● Nettoyage et entretien La prise Wi-Fi doit être débranchée du courant avant de la nettoyer� Utilisez un chiffon s
Garantie et serviceFR 139électroniques et de sa transposition en droit national, les équipements usagés doivent être collectés séparément et recyclés
Sicherheitshinweise14 DE GEFAHR! Bitte verwenden Sie die Wi-Fi-Steckdose nicht, wenn Sie feststellen, dass sie in irgendeiner Weise beschädigt ist�
Garantie et service140 FR ● Adresse du centre de servicesVeuillez nous contacter avant de retourner votre prise Wi-Fi défectueuse� Nous nous ferons u
Garantie et serviceFR 141 ● FabricantUni-Elektra GmbHKirchstrasse 4872145 HirrlingenAllemagneWiFi Sockets v1.4 DE-IT-FR-GB.indd 141 1/28/2015 2:5
Déclaration de conformité142 FR ● Déclaration de conformitéNous, Uni-Elektra GmbH à Hirrlingen, Allemagne, affirmons par la présente que la prise Wi-F
Déclaration de conformitéFR 143Signature :Mr Thomas GüntherPDG d'Uni-Elektra GmbHDate : 10-10-2014Lieu : Hirrlingen, AllemagneWiFi Sockets v1.4
144 FRWiFi Sockets v1.4 DE-IT-FR-GB.indd 144 1/28/2015 2:50:40 PM
GB 145ContentsIntroduction ���������������������������������������������������������� 148Intended use ���������������������������������������������
146 GBInstallation, connection to the network, and registration ���������������������������������������������������� 155Use ����������������������
GB 147How to reset all settings ����������������������������������������� 178Forget Password ��������������������������������������������������� 17
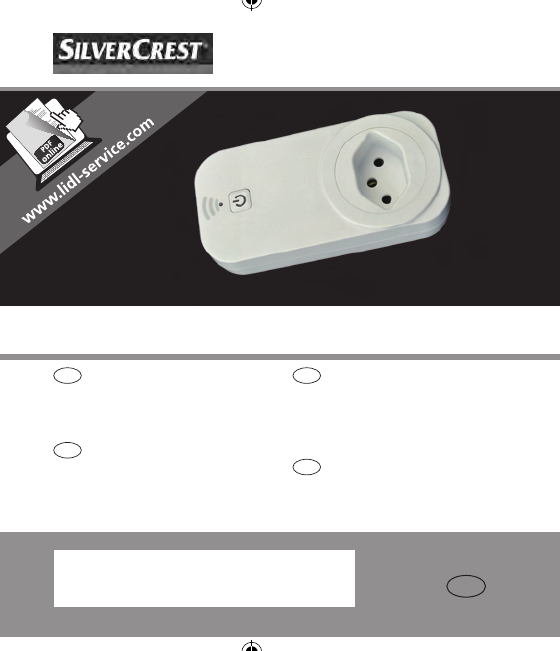
Introduction148 GBWiFi Socket ● IntroductionCongratulations on the purchase of your new WiFi socket� You have bought a quality product� This instruc
IntroductionGB 149intended can lead to serious injury� The manufacturer is not liable for damages incurred through the improper use of this product�
SicherheitshinweiseDE 15Wi-Fi-Steckdose in Kontakt mit Wasser o�ä� gekommen ist, muss diese sofort vom Stromnetz getrennt und von einem Fachmann übe
Introduction150 GBSystem Requirements: iOS 5�0 or above and Android 4�0 or aboveManual version: V1�5 ● Description of parts and controls (Figure A)1
IntroductionGB 151 ● Trademark rightsThe manufacturer has made every effort to protect the trademark information mentioned in this manual� All trade
Safety notes152 GB CAUTION!This symbol, together with the word “CAUTION!”, designates a danger, which – if neglected – can lead to injuries and caus
Safety notesGB 153of knowledge or experience may use this product only when a person responsible for their safety has instructed or is supervising t
Safety notes154 GB In the event of unusual sounds, smells, or if the WiFi socket starts to smoke, it must be disconnected from the power point imm
InstallationGB 155 ● Installation ● Select a suitable place for installationEnsure that: – the WiFi socket is positioned close enough to your WiFi r
Installation156 GB Connect the WiFi socket to the power outlet according to the instruction in figure A� Press and hold the LED on/off button 4 o
InstallationGB 157 If you are using the app for the first time, press Sign Up� The “Sign Up” window is displayed� If you are already registered, lo
Installation158 GB Enter the email address with which you would like to register, and input a password� Press Sign Up� If the registration is su
InstallationGB 159 Log in using your registered email address and password, and press Log In to confirm� The “WiFi Devices” window appears� WiFi So
Installation16 DE ● Installation ● Wählen Sie einen geeigneten Platz für die InstallationStellen Sie sicher, dass: – die Wi-Fi-Steckdose dicht genug
Installation160 GB Select the “+” icon� Your wireless network will be selected automatically� Add the password of your wireless network� Press S
InstallationGB 161 Note: When installing a new WiFI socket, it is automatically called “kemanRT”� The method for changing this name is described i
Use162 GB ● UseIMPORTANT! Use the app to operate or change the settings of your WiFi socket� If you want to do this from an arbitrary location, then
UseGB 163 ● How to switch your device on/off using the app Even when a connected device is being controlled by means of a programmed timer, it is
Use164 GB For improved clarity and when using multiple WiFi sockets, each socket can be assigned its own name� Select the WiFi socket whose name a
UseGB 165 Select Edit� The Edit window appears�WiFi Sockets v1.4 DE-IT-FR-GB.indd 165 1/28/2015 2:50:42 PM
Use166 GB Change the name of the WiFi socket in the “Name” field� Change the icon by selecting an icon from the list or select the “+” icon to ch
UseGB 167 ● How to add a timer Using the timer function you can set the day of the week and time at which a device connected to the WiFi socket sh
Use168 GB In the Time section, set the time� In the Power section, choose whether the connected device should be switched on or off� A connected d
UseGB 169switched off� In the Repeat section, choose the days on which the connected device should be switched on or off� Select Save� Repeat th
InstallationDE 17 Stellen Sie sicher, dass die Tastatur des Mobiltelefons nicht die SilverCrest Wifi Plug App-Schaltflächen überlagert� Um Ihre Tasta
Use170 GB In the After section, set the count down time� In the Power section, choose whether the connected device should be switched on or off�
UseGB 171 ● How to add an Absence Mode Using the absence mode function, you can set a period of time in which your connected device automatically
Use172 GB Set the time period in which your connected device should switch itself on and off every 30 minutes� Select Save�WiFi Sockets v1.4 DE-
UseGB 173 ● How to delete a Timer, Count Down or Absence setting In order to delete the settings for a timer, a countdown timer, or the absence mo
Use174 GB Tap on the WiFi socket that you would like to delete and keep it pressed until the Bin icon appears at the lower edge of the screen� Sel
UseGB 175 Select the Bin icon at the bottom of the screen� Select OK�WiFi Sockets v1.4 DE-IT-FR-GB.indd 175 1/28/2015 2:50:44 PM
Use176 GB ● How to lock and unlock a WiFi socket A WiFi socket can be locked so that other users cannot add the same socket to their lists� In o
UseGB 177WiFi Sockets v1.4 DE-IT-FR-GB.indd 177 1/28/2015 2:50:44 PM
Use178 GB ● How to reset all settings It is possible to reset the WiFi socket and erase all settings� In order to reset the WiFi socket, press
UseGB 179 ● Forget Password Open the SilverCrest WiFi Plug app� Press Forgot password� WiFi Sockets v1.4 DE-IT-FR-GB.indd 179 1/28/2015 2:50
Installation18 DE Vor der ersten Benutzung drücken Sie Registrierung� Das Fenster „Registrierung“ wird angezeigt� Sind Sie schon registriert, meld
Use180 GB The “Forgot Password” window is displayed� Enter the email address with which you registered, then press OK� A link for changing you
UseGB 181email address� Please check your email inbox� Note: This process may take a few minutes� Please also check your spam folder� Click on the
Maintenance182 GB Please now enter your email address and your new password, then press Log In to confirm� The “WiFi Devices” window appears� ● M
Cleaning and MaintenanceGB 183interference� If interference occurs, move such objects away from the WiFi socket� The WiFi socket uses radio signa
Disposal184 GB ● DisposalThe packaging is made of environmentally friendly materials, which may be disposed through your local recycling facilities�
Warranty and ServiceGB 185 ● Warranty and ServiceThis product has a 3year guarantee from the date of purchase extended only to the original buyer,
Warranty and Service186 GBUni-Elektra GmbHKirchstrasse 4872145 HirrlingenGermanyTel�: +49 (0) 74 78 / 9 13 85-0E-Mail: service@uni-elektra�deIAN 103
Declaration of ConformityGB 187 ● Declaration of ConformityWe, Uni-Elektra GmbH in Hirrlingen, Germany, hereby affirm that the WiFi socket (identifica
Declaration of Conformity188 GBSignature:Mr Thomas GüntherCEO Uni-Elektra GmbHDate: 10-10-2014Place: Hirrlingen, GermanyWiFi Sockets v1.4 DE-IT-FR-G
a1432bWiFi Sockets v1.4 DE-IT-FR-GB.indd 4-6 1/28/2015 2:49:04 PM
InstallationDE 19 Geben Sie Ihre E-Mail-Adresse, mit der Sie sich registrieren möchten, ein und legen Sie ein Passwort an� Drücken Sie Registrie
Stand der Informationen · Version des informations · Versione delle informazioni · Stand van de informatie · Last Information Update: 01/2015 · Ident.
Stand der Informationen · Version des informations · Versione delle informazioni · Stand van de informatie · Last Information Update: 01/2015 · Ident.
Installation20 DE Melden Sie sich mit Ihrer registrierten E-Mail-Adresse und Ihrem Passwort an und drücken sie Einloggen zur Bestätigung� Das Fens
InstallationDE 21 Wählen Sie das Symbol „+“� Ihr drahtloses Netzwerk wird automatisch ausgewählt� Fügen Sie das Kennwort Ihres drahtlosen Netzwe
Installation22 DE Hinweis: Beim Einrichten einer neuen Wi-Fi-Steckdose wird diese automatisch “kemanRT” genannt� Das Ändern des Namens ist im Kapi
VerwendungDE 23 ● VerwendungWICHTIG! Verwenden Sie die App zur Bedienung oder zum Ändern von Einstellungen an Ihrer Wi-Fi-Steckdose� Wenn Sie dies v
Verwendung24 DE ● So schalten Sie Ihr Gerät mittels App Selbst wenn ein angeschlossener Verbraucher mittels einer programmierten Zeitschaltuhr ges
VerwendungDE 25 Zur besseren Übersichtlichkeit und bei Verwendung mehrerer Wi-Fi-Steckdosen, kann jeder Wi-Fi-Steckdose ein eigener Name zugeordne
Verwendung26 DE Wählen Sie Bearbeiten� Das Fenster „Bearbeiten“ wird angezeigt�WiFi Sockets v1.4 DE-IT-FR-GB.indd 26 1/28/2015 2:50:25 PM
VerwendungDE 27 Ändern Sie den Namen der Wi-Fi-Steckdose in dem Feld „Name“� Ändern Sie das Symbol durch die Auswahl eines Symbols aus der Liste
Verwendung28 DE ● So wird ein Timer hinzugefügt Mit der Timerfunktion können Sie Wochentag und Zeit festlegen, zu der ein an die Wi-Fi-Steckdose a
VerwendungDE 29 Stellen Sie die Zeit in dem Abschnitt Zeit ein� In dem Abschnitt Power wählen Sie aus, ob sich der angeschlossene Verbraucher ein-
a1432bWiFi Sockets v1.4 DE-IT-FR-GB.indd 4-6 1/28/2015 2:49:04 PM
Verwendung30 DEausgeschaltet� In dem Abschnitt Wiederholen wählen Sie die Tage aus, an denen sich der angeschlossene Verbraucher ein- oder ausschalt
VerwendungDE 31 In dem Abschnitt Nach stellen Sie die Countdown-Zeit ein� In dem Abschnitt Power wählen Sie aus, ob sich der angeschlossene Verbra
Verwendung32 DE ● So wird ein Abwesenheitsmodus hinzugefügt Mit der Abwesenheitsmodus-Funktion können Sie einen Zeitraum festlegen, in welchem sic
VerwendungDE 33 Stellen Sie den Zeitraum ein, in dem sich Ihr angeschlossener Verbraucher alle 30 Minuten ein- und ausschalten soll� Wählen Sie
Verwendung34 DE ● So löschen Sie die Einstellungen für Timer, Countdown oder Abwesenheit Um die Einstellung für einen Timer, einen Countdown oder
VerwendungDE 35 ● So wird eine Wi‑Fi‑Steckdose entfernt Um eine Wi-Fi-Steckdose zu entfernen, öffnen Sie die SilverCrest Wifi Plug App� Die Liste d
Verwendung36 DE Wählen Sie das Symbol Papierkorb am unteren Rand des Bildschirms� Wählen Sie OK�WiFi Sockets v1.4 DE-IT-FR-GB.indd 36 1/28/20
VerwendungDE 37WiFi Sockets v1.4 DE-IT-FR-GB.indd 37 1/28/2015 2:50:27 PM
Verwendung38 DE ● So wird eine Wi‑Fi‑Steckdose ge‑ und entsperrt Ein Wi-Fi-Steckdose kann gesperrt werden, sodass andere Nutzer nicht dieselbe Wi-
VerwendungDE 39WiFi Sockets v1.4 DE-IT-FR-GB.indd 39 1/28/2015 2:50:27 PM
a1432bWiFi Sockets v1.4 DE-IT-FR-GB.indd 4-6 1/28/2015 2:49:04 PM
Verwendung40 DE ● So werden alle Einstellungen zurückgesetzt Es ist möglich, die Wi-Fi-Steckdose zurückzusetzen und alle Einstellungen zu löschen�
VerwendungDE 41 ● Passwort vergessen Öffnen Sie die SilverCrest Wifi Plug App� Drücken Sie Passwort vergessen� WiFi Sockets v1.4 DE-IT-FR-GB.indd
Verwendung42 DE Das Fenster „Passwort vergessen“ wird angezeigt� Geben Sie Ihre E-Mail Adresse, mit der Sie sich registriert haben, ein und drück
VerwendungDE 43 Es wird Ihnen ein Link zum Ändern Ihres Passwortes an Ihre registrierte E-Mail-Adresse geschickt� Bitte überprüfen Sie den Posteing
Instandhaltung44 DE Nach erfolgreicher Einrichtung des neuen Passwortes erhalten Sie die Nachricht „Success“� Falls Sie diese Mitteilung nicht ers
FehlerbehebungDE 45 ● Fehlerbehebung Die Wi-Fi-Steckdose enthält empfindliche elektronische Komponenten� Dies bedeutet, dass es zu Störungen kommen
Reinigung und Pflege46 DE ● Reinigung und Pflege Bevor die Wi-Fi-Steckdose gereinigt wird, muss diese von der Netzsteckdose getrennt werden� Rein
Garantie und ServiceDE 47In Übereinstimmung mit der europäischen Richtlinie 2012/19/EU über Elektro- und Elektronik-Altgeräte und deren Umsetzung in
Garantie und Service48 DE ● ServiceadresseBitte kontaktieren Sie uns, bevor Sie Ihre defekte Wi-Fi-Steckdose zurücksenden� Wir rufen Sie auch gern z
Garantie und ServiceDE 49 ● HerstellerUni-Elektra GmbHKirchstrasse 4872145 HirrlingenDeutschlandWiFi Sockets v1.4 DE-IT-FR-GB.indd 49 1/28/2015
DE 05InhaltEinführung ���������������������������������������������������������������� 8Bestimmungsgemäße Verwendung ������������������������������
Hinweise zur Konformitätserklärung50 DE ● Hinweise zur KonformitätserklärungHiermit bestätigen wir, die Uni-Elektra GmbH in Hirrlingen, dass die Wi-
Hinweise zur KonformitätserklärungDE 51Unterschrift:Hr� Thomas GüntherGeschäftsführer Uni-Elektra GmbHDatum: 10-10-2014Ort: Hirrlingen, GermanyWiFi
52 DEWiFi Sockets v1.4 DE-IT-FR-GB.indd 52 1/28/2015 2:50:28 PM
IT 53IndiceIntroduzione ����������������������������������������������������������� 56Uso previsto ������������������������������������������������
54 ITUso ����������������������������������������������������������������������� 70Accendere/spegnere un dispositivo manualmente ������� 70Accender
IT 55Manutenzione �������������������������������������������������������� 91Risoluzione dei problemi ������������������������������������������ 92
Introduzione56 ITPresa Wi‑Fi ● IntroduzioneComplimenti per l'acquisto della nuova presa Wi-Fi� Il vostro acquisto è un prodotto di alta qualità
IntroduzioneIT 57alla rovescia e la modalità di assenza possono essere programmate� Alterare questo prodotto o utilizzarlo in un modo diverso da que
Introduzione58 ITDisponibilità app: Google Play Store e Apple StoreRequisiti di Sistema: iOS 5�0 o superiori e Android 4�0 o superioriVersione del m
IntroduzioneIT 59 ● Diritti di marchioIl produttore ha fatto ogni sforzo per proteggere le informazioni sui marchi menzionati in questo manuale� Tut
06 DEInstallation, Verbindung mit dem Netzwerk und Registrierung ���������������������������������������������������������� 16Verwendung ����������
Note sulla sicurezza60 IT ATTENZIONE!Questo simbolo, insieme alla parola "ATTENZIONE!", indica un pericolo, che - se trascurato - può port
Note sulla sicurezzaIT 61persone con ridotte capacità fisiche o intellettuali, mancanza di esperienza e conoscenza se non sotto la supervisione o die
Note sulla sicurezza62 IT Non collegare schede di alimentazione alla presa Wi-Fi� Il sovraccarico può provocare incendi con conseguente lesioni o m
InstallazioneIT 63 Non tentare mai di aprire la scatola della presa Wi-Fi� La scatola aperta può causare scosse elettriche o elettrocuzione� Le ri
Installazione64 IT ● Installazione, collegamento alla rete e registrazione Cercare l'applicazione gratuita SilverCrest Wi-Fi Plug nell'A
InstallazioneIT 65 Se si utilizza l'applicazione per la prima volta, premere Iscriviti� Viene visualizzata la finestra della "Iscriviti&q
Installazione66 IT Inserire l'indirizzo e-mail con il quale si desidera registrare, e inserire una password� Premere Iscriviti� Se la regis
InstallazioneIT 67 Accedere utilizzando l'indirizzo e-mail registrato e la password e premere Accesso per confermare� Appare la finestra "
Installazione68 IT Selezionare l'icona "+"� La rete wireless verrà selezionata automaticamente� Aggiungere la password alla rete
InstallazioneIT 69 Nota� Quando viene installata una nuova presa Wi-Fi, questa viene chiamata automaticamente "kemanRT"� Il metodo per m
DE 07So werden alle Einstellungen zurückgesetzt ���������������� 40Passwort vergessen ������������������������������������������������� 41Instandha
Uso70 IT ● UsoIMPORTANTE! Utilizzare l'applicazione per operare o modificare le impostazioni della presa Wi-Fi� Se si vuole fare ciò da una posi
UsoIT 71 ● Accendere/spegnere un dispositivo con l'app Anche quando un dispositivo collegato viene controllato tramite un timer programmato,
Uso72 IT Per maggiore chiarezza e quando si utilizzano più prese Wi-Fi, a ogni presa può essere assegnato un nome proprio� Selezionare la presa Wi
UsoIT 73 Selezionare Modifica� Compare la finestra Modifica�WiFi Sockets v1.4 DE-IT-FR-GB.indd 73 1/28/2015 2:50:31 PM
Uso74 IT Modificare il nome della presa Wi-Fi nel campo "Nome"� Cambiare l'icona selezionando un'icona dall'elenco o sel
UsoIT 75 ● Come aggiungere un timer Utilizzando la funzione timer è possibile impostare il giorno della settimana e l'ora in cui il dispositi
Uso76 IT Nella sezione Ora, impostare l'Orario� Nella sezione Accendi selezionare se il dispositivo collegato deve essere acceso o spento� Un
UsoIT 77il dispositivo si spegne� Nella sezione Ripeti selezionare i giorni in cui il dispositivo collegato deve essere acceso o spento� Seleziona
Uso78 IT Nella sezione Fra impostare l'orario del conto alla rovescia� Nella sezione Accendi selezionare se il dispositivo collegato deve ess
UsoIT 79 ● Come aggiungere una Modalità Assenza Utilizzando la funzione di modalità di assenza, è possibile impostare un periodo di tempo in cui i
Einführung08 DEWi‑Fi‑Steckdose ● EinführungHerzlichen Glückwunsch zum Kauf dieser Wi-Fi-Steckdose� Sie haben ein Qualitätsprodukt erworben� Diese Be
Uso80 IT Impostare il periodo di tempo in cui il dispositivo collegato dovrebbe accendersi e spegnersi ogni 30 minuti� Selezionare Salva�WiFi So
UsoIT 81 ● Come cancellare le impostazioni di Timer, Conto alla Rovescia e Assenza Per cancellare le impostazioni di un timer, un conto alla roves
Uso82 IT ● Come rimuovere una presa Wi‑Fi Al fine di rimuovere una presa Wi-Fi, aprire l'applicazione SilverCrest Wi-Fi Plug� Viene visualizza
UsoIT 83 Selezionare l'Icona cestino nella parte inferiore dello schermo� Selezionare OK�WiFi Sockets v1.4 DE-IT-FR-GB.indd 83 1/28/2015
Uso84 ITWiFi Sockets v1.4 DE-IT-FR-GB.indd 84 1/28/2015 2:50:32 PM
UsoIT 85 ● Come bloccare e sbloccare una presa Wi‑Fi Una presa di Wi-Fi può essere bloccata in modo che altri utenti non possano aggiungere la ste
Uso86 ITWiFi Sockets v1.4 DE-IT-FR-GB.indd 86 1/28/2015 2:50:33 PM
UsoIT 87 ● Come azzerare tutte le impostazioni È possibile azzerare la presa Wi-Fi per cancellare tutte le impostazioni� Al fine di ripristinare
Uso88 IT ● Recupero password Aprire l'app SilverCrest Wi-Fi� Premere Password dimenticata� WiFi Sockets v1.4 DE-IT-FR-GB.indd 88 1/28/201
UsoIT 89 Viene visualizzata la finestra "Password dimenticata"� Inserire l'indirizzo e-mail con il quale si è registrato, e premere
EinführungDE 09 ● Bestimmungsgemäße VerwendungDie Wi-Fi-Steckdose ist ein Produkt der Regel- und Steuertechnik� Sie dient dazu, einen angeschlossene
Uso90 IT Un link per cambiare la password sarà inviato all'indirizzo e-mail registrato� Controllare la casella di posta elettronica� Nota� Il
ManutenzioneIT 91 Una volta che la nuova password è stata impostata correttamente, verrà visualizzato il messaggio: "Riuscito"� Se quest
Risoluzione dei problemi92 IT ● Risoluzione dei problemi La presa Wi-Fi contiene componenti sensibili all'elettricità statica� Ciò significa c
Pulizia e manutenzioneIT 93 ● Pulizia e manutenzione Assicurarsi di rimuovere la presa Wi-Fi dal punto di alimentazione prima della pulizia� Pu
Garanzia e assistenza94 ITsoggette a raccolta differenziata e devono essere riciclate in modo ecologicamente sostenibile�Quando si decide di liberar
Garanzia e assistenzaIT 95 ● Indirizzo centro assistenzaVi preghiamo di contattarci prima di restituire la presa Wi-Fi difettosa� Vi richiameremo vo
Garanzia e assistenza96 IT ● ProduttoreUni-Elektra GmbHKirchstrasse 4872145 HirrlingenGermaniaWiFi Sockets v1.4 DE-IT-FR-GB.indd 96 1/28/2015 2:
Dichiarazione di ConformitàIT 97 ● Dichiarazione di ConformitàNoi, l’Uni-Elektra GmbH di Hirrlingen, Germania, con la presente affermiamo che la pre
Dichiarazione di Conformità98 ITFirma:Sig� Thomas GüntherCEO Uni-Elektra GmbHData: 10-10-2014Luogo: Hirrlingen, GermaniaWiFi Sockets v1.4 DE-IT-FR-G
FR 99Table des matièresIntroduction ���������������������������������������������������������� 102Utilisation prévue �������������������������������
More documents for For Home Silvercrest SWS-A1

Related products and manuals for For Home Silvercrest SWS-A1

 (99 pages)
 (34 pages)
(204 pages)
(34 pages)
(34 pages)
(204 pages)
© 2020, manymanuals.com. All rights reserved. | 0.900 s |
 Manymanuals.com
 Manymanuals.de
 Manymanuals.fr
 Manymanuals.it
 Manymanuals.pl
 Manymanuals.cz
 Manymanuals.es
 Manymanuals-pt.com
Comments to this Manuals